Let’s start by exploring the deployment topology. First, we split the Chapter 18 REPR project into two services: Baskets and Products. Then, we add a BFF API that fronts the two services to simplify using the system. We do not have a UI per se, but one http file per project exists to simulate HTTP requests. Here’s a diagram that represents the relationship between the different services:
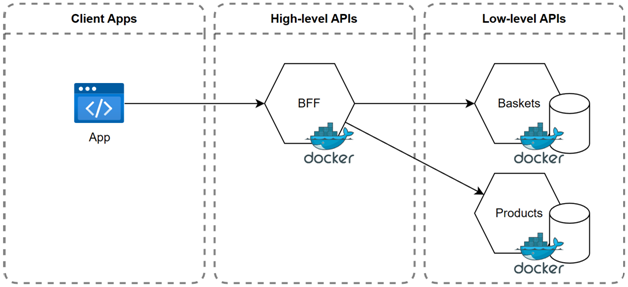
Figure 19.25: a diagram that represents the deployment topology and relationship between the different services
The easiest and most extendable way to start the projects is to use Docker, but it is optional; we can also start the three projects manually. Using Docker opens many possibilities, like using a real SQL Server to persist the data between runs and add more pieces to our puzzle, like a Redis cache or an event broker, to name a few.Let’s start by manually starting the apps.
Manually starting the projects
We have three projects and need three terminals to start them all. From the chapter directory, you can execute the following commands, one set per terminal window, and all projects should start:# In one terminal
cd REPR.Baskets
dotnet run
# In a second terminal
cd REPR.Products
dotnet run
# In a third terminal
cd REPR.BFF
dotnet run
Doing this should work. You can use the PROJECT_NAME.http files to test the APIs.Next, let’s explore the second option about using Docker.
Using Docker Compose to run the projects
At the same level as the solution file, the docker-compose.yml, docker-compose.override.yml, and various Dockerfile files are preconfigured to make the projects start in the correct order.
Here’s a link to get started with Docker: https://adpg.link/1zfM
Since ASP.NET Core uses HTTPS by default, we must register a development certificate with the container, so let’s start here.
Configuring HTTPS
This section quickly explores using PowerShell to set up HTTPS on Windows. If you are using a different operating system or if the instructions are not working, please consult the official documentation: https://adpg.link/o1tuFirst, we must generate a development certificate. In a PowerShell terminal, run the following commands:
dotnet dev-certs https -ep “$env:APPDATA\ASP.NET\Https\adpg-net8-chapter-19.pfx” -p devpassword
dotnet dev-certs https –trust
The preceding commands create a pfx file with the password devpassword (you must provide a password, or it won’t work), then tell .NET to trust the dev certificates.From there, the ASPNETCORE_Kestrel__Certificates__Default__Path and ASPNETCORE_Kestrel__Certificates__Default__Password environment variables are configured in the docker-compose.override.yml file and should be taken into account.
If you change the certificate location or the password, you must update the docker-compose.override.yml file.